
Understanding aperture is one of the most important breakthroughs in beginner photography, and most people never get there because nobody explains it in plain English. That soft, blurry background you’ve seen in portraits and assumed required expensive gear has a name: bokeh. It isn’t magic, it isn’t a camera upgrade, and it isn’t luck. It’s aperture. And you already have it on the camera you’re holding right now.
You own the Camera. You’re in control.
The Moment
You’re standing in front of a subject. Could be your kid on the back porch. A flower in the yard. A friend sitting at a café table. Something worth photographing.
You shoot it. You look at the screen. It’s fine. But the background is competing with your subject in a way you didn’t intend. The fence. The car. The other tables. All of it sharp, all of it competing, all of it pulling attention away from the thing you wanted the eyes to focus on.
You’ve been here before. In Unit 2, we solved this with your feet; move your position, change your angle, find a cleaner background. That still works. That will always work.
But now you have a second tool. And it lives inside the lens.
The Real Problem
That soft, blurry background you’ve seen in portraits, the one that looks expensive, the one you assumed required a better camera. Well it has a name. Photographers call it bokeh. And for years it probably felt like something that happened to other people’s photos.
It’s not magic. It’s not a camera upgrade. It’s not luck. It’s Aperture. And you already have it.
Most beginners never touch aperture because nobody explained what it actually does in plain English. It sounds technical. The numbers seem backwards. And auto mode has been handling it quietly this whole time, making decisions you didn’t know were yours to make.
They are yours. They’ve always been yours to make. Time to make friends.
The Fix
Aperture is a small diaphragm inside the back of a lens; an adjustable hole that you set manually before you press the shutter. Make it wider and more light comes in. Make it narrower and less light gets through. You control the size of the hole. Simple enough.
Bigger hole. Shallower depth of field. Which means less of your scene is in sharp focus, and that matters more than it sounds.
Depth of field is the area in a shot that’s actually in focus. Think of it as the area of sharpness. That zone can be wide, with most of the scene sharp, foreground to background. Or it can be shallow, only a narrow slice of the scene is sharp, and everything else falls away. The size of that zone? That’s what aperture controls.
But here’s the best part: you control it. How much of your scene is sharp. How much isn’t. All of it, you decide.
THE SECRET? Meet the f-stop. The f-stop is simply the size of the hole; but here’s where it gets interesting. F-stop numbers aren’t arbitrary. They’re derived from a formula: f-stop = focal length ÷ aperture diameter. So if you’re shooting your 70-200mm zoomed out to 200mm and the opening is 71.4mm wide, your f-stop is f/2.8. Narrow that opening to 50mm and you’re at f/4. That’s three stops less light; in a dark gym, a dim auditorium, or a sideline at dusk. Those three stops are the difference between a sharp image and a blurry one. Now you know what photographers mean when they say they need a faster lens!
Translation: the bigger the hole, the smaller the number. It’s math. It just looks like a conspiracy to confuse beginners until you see it as a fraction.
Here’s the map: A 200mm lens at f/2.8; the opening is 71.4mm wide. That same lens at f/4; the opening is 50mm wide.
Bigger number, smaller hole. Smaller number, bigger hole. Every time.
Aperture = the adjustable diaphragm. F-stop = the size of the hole. Smaller f-stop number = wider hole = shallower depth of field. Bigger f-stop number = narrower hole = more of the scene in focus.
(See the graphic below — that’s your 70-200mm f/2.8 from f/2.8 to f/32. Ten stops. One dial. The hole tells the whole story.)
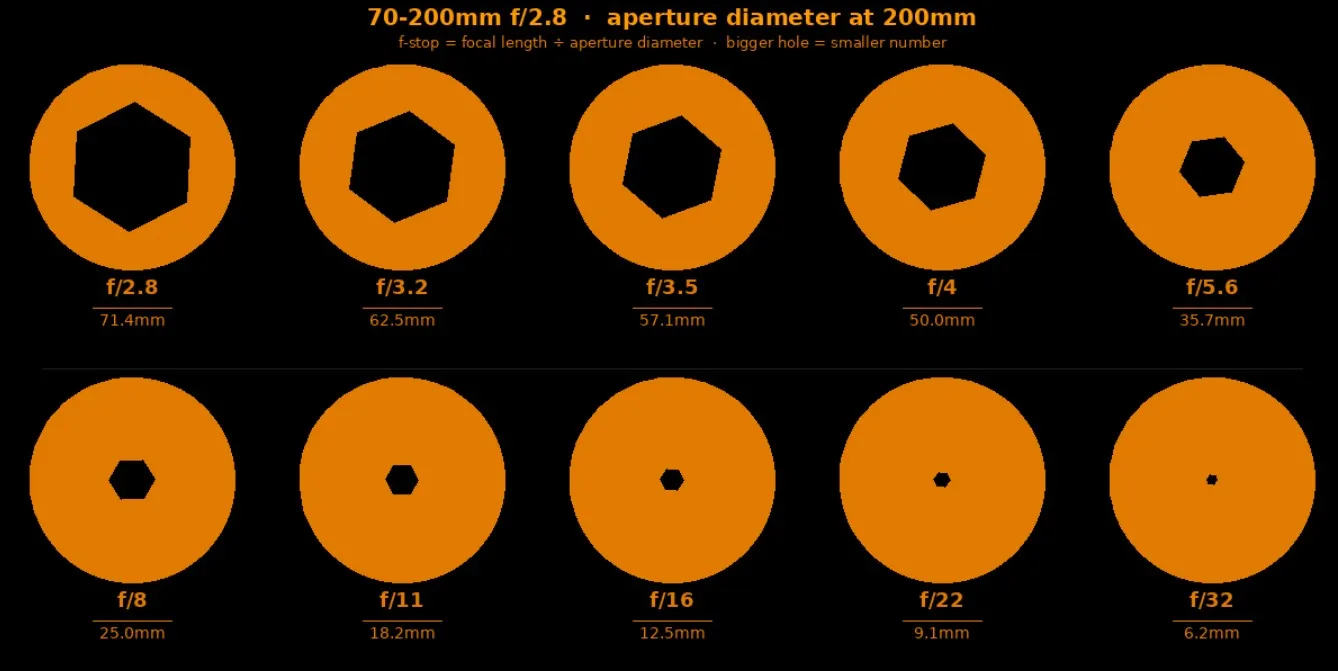
The most expensive argument in photography, easy: f/2.8 or f/4!
Now back to your subject. Wide open at f/2.8; your subject is sharp, the background goes soft, the fence disappears, the car becomes a smear of color. Change f-stop up to f/11; subject sharp, background sharp, everything in the frame tells a story.
Neither one is correct. Both are decisions. The aperture doesn’t choose, you do.
Try it with the same subject, from the same position, without zooming your feet. Shoot it wide open. Then next f-stop larger. Look at what changes. The subject didn’t move. The background didn’t move. Only the aperture moved, and the story changed completely.
And that, my photographers disguised as musicians, is the background note you just learned to play. See Unit 2, Lesson 5: The Rule Is the Scale. The Frame Is the Instrument.
The Sideline Lesson
In Unit 2, you learned that background management is a decision. You solved it by moving, changing position, finding a cleaner line, getting off the stands and into the story. Pillar 2. Position determines the photograph.
Aperture doesn’t replace that. It adds to it. Now you have two instruments working at the same time, your feet zooming and your lens. A photographer who understands both can walk into almost any situation and control what the viewer sees.
That’s not a technical skill. That’s ownership.
This is Pillar 4 — Control. And this is what Pillar 4 actually means in practice: not mastering a menu, not memorizing settings, but understanding that every control on your camera exists to serve a decision you’re already making. Aperture doesn’t introduce a new decision. It gives you a new way to execute one you’ve been making since Unit 2.
The camera is still the instrument. You just learned another note.
The Takeaway
The blur isn’t magic. It’s aperture. New note learned.
In the Lab
Try this: Find one subject; a person, a plant, anything with some distance between it and the background in good light. Shoot it three times without moving your feet. First, as wide open as your lens will go. Second, somewhere in the middle. Third, stopped all the way down. As you change the aperture you may also need more light.
Don’t change anything else. Same subject. Same light. Same position. Just the aperture.
Look at all three. Ask yourself which background tells the story you want. That answer is your aperture decision.
Trust it. Trust yourself.
—TMac #shooton
