
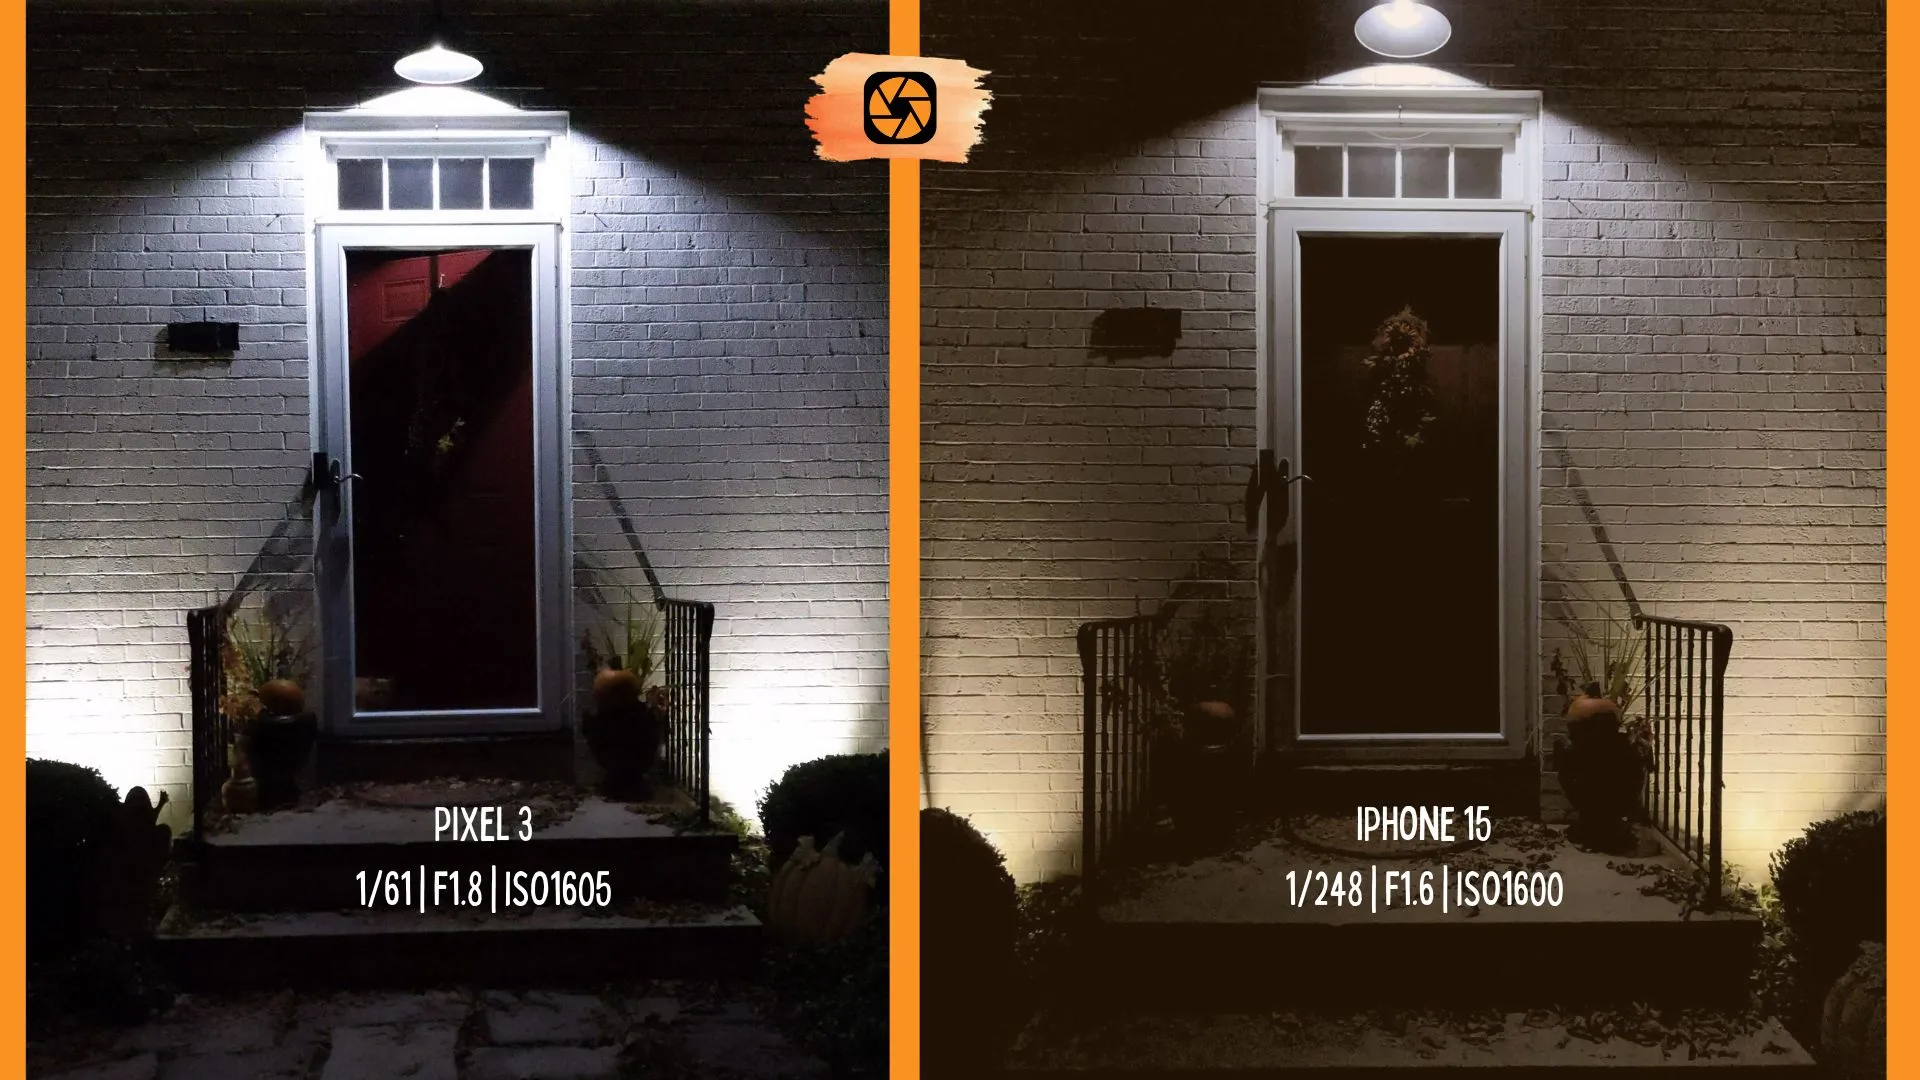
Sunday night. Light burning. Two phones on a tripod, both aimed at the door. I set both to 1/250 and ISO 1600 (or as close as I could get dragging a slider). I took the pictures. They didn’t match. The Pixel’s came out darker, so to match the light I slowed the shutter and arrived at 1/61.
The Miss
You froze the action. Now the picture is dark.
Last week we fixed the blur. You picked a fast shutter, 1/800 for the moving kid. Good call. Then you looked at the picture. Dark. Shadows gone.
A fast shutter lets in less light. That’s the deal. Nothing’s free.
Your phone’s own camera would have slowed the shutter to get the light back. The blur comes right back with it. It makes that swap every time you don’t tell it otherwise.
Shutter speed buys sharpness. ISO pays for the light.
The Photo Lab
The Lesson + Lab
ISO is your phone turning up the volume on the light it already caught. Double the ISO, double the brightness. That’s one stop.
Count them. ISO 100, 200, 400, 800, 1600. Four steps. Shutter speed runs the other way. 1/15 to 1/250 is four steps too (15 times 16 is 240, close enough to 250). So ISO 100 at 1/15 gives you about the same brightness as ISO 1600 at 1/250.
Same math as last week’s numbers. Still subject, 1/200. Moving subject, 1/800. That’s two steps. If a still picture looks right at ISO 200 and 1/200, the moving version in the same light needs ISO 800.
Why only these two? Your phone’s aperture is a hole that doesn’t change size. In my own files it’s f/1.6 on the iPhone 15 and f/1.8 on the Pixel 3. I did the math on that hole in the blur lesson. Shutter and ISO are software. An app can do them. An aperture has to physically open and close, and that has a mixed history on phones.
Not new, either. Wikipedia lists the Motorola Zine ZN5 from 2008 as the earliest known phone with a variable aperture, f/2.8 to f/5.6. The Nokia N86 followed in 2009 with three levels. Now the iPhone 18 Pro, on sale since September 18, runs f/1.48 to f/4 on its main camera. Lee Morris at Fstoppers tested every setting and found ordinary-light photos “essentially the same” as the 17 Pro. Eighteen years from the Zine to today. Shutter and ISO you can have today, free.
In the ISO lesson I told you to let it run on auto. I still say that most days. This is for the day auto picks wrong.
The two apps
HedgeCam 2 (Android). Turn on the Camera2 API in its settings, the same setting Open Camera needed last week. Manual mode needs it. Then you get ISO and shutter sliders. Touch one and a number pops up while you drag. A fingertip won’t snap to the stops. Same problem I flagged last week. You’ll miss exact numbers a few times. There’s also a preset list: 55, 100, 200, 400, 800, 1600, 3200, 6400. Tap one and the ISO locks. The shutter moves on its own to keep the picture bright. That’s the mirror of Lightroom Mobile last week, where you picked the shutter and the ISO moved. In my testing: no ads, no nags, no purchase screens. A donate button in settings.
Yamera (iPhone). Free, with a banner ad along the bottom that changes about every minute. It stays on the upgrade screen too. One I saw I didn’t like at all. If kids borrow your phone, know that. To set ISO, tap M, tap ISO, drag the slider. Same fingertip problem. I aimed for 1/250. The file says 1/248. Close enough.
There’s a big Pro Features button at the top of Settings. Pro is $1.99, buy once, and the screen says it’s for life. It lists 48 megapixels, HDR, Deep Fusion, HEIF, RAW and timestamp styles, plus video features to explore. Does Pro remove the ad? The screen doesn’t say, and I can’t confirm it. I didn’t buy it. Every picture here came from the free version, which gave me 12 megapixel JPEGs.
The door, three ways
I shot the door at dusk on both phones, about ISO 100, 1600 and 6400. I set the shutter to keep the brightness close: 1/15, 1/250, 1/1000. I dragged sliders, so I never hit a number exactly. The brightness drifted a little.
At ISO 100 both pictures were clean. At ISO 1600 both had grain, and the color shifted. Purple on the Pixel. Green-gold on the iPhone. ISO noise? That’s texture, baby. It’s even on a t-shirt. At 1600 the door is still your door.
At ISO 6400 it changed. Heavy colored speckle. The Pixel streaked along the cornice. The iPhone came out darker and the shadows turned to black. That isn’t texture anymore. The picture is more speckled.
Here’s the part that surprised me. Same ISO, same 1/250, and the pictures didn’t match. The iPhone file says 1/248 at ISO 1600. The Pixel needed 1/61 to get close. I aimed for 1/60 and the slider landed on 1/61. The gap is two stops of shutter, or about four times slower (248 divided by 61 is about 4, and 4 is two doublings). The aperture covers about a third of a stop, f/1.6 against f/1.8. The rest I can’t explain from the numbers. Different sensors, different processing. I won’t guess how much each one matters.
So ISO 1600 on one phone is not ISO 1600 on another. Trust the picture. Not the number.
Here’s the rule I’m using. Raise the ISO until the picture is bright enough at the shutter speed you need. Then stop. Every step past that costs you. If your subject is sitting still, go the other way. Lower the ISO, slow the shutter, brace the phone. I wrote about the moving-subject version at night games: noisy and sharp beats clean and blurry.
Lab: Try This
Pick a dim spot. A front door at dusk works. Set the phone on something steady.
- Open your app. HedgeCam 2: manual mode, find the ISO presets. Yamera: tap M, tap ISO.
- Take a picture at ISO 100.
- Take one at 1600 and one at 6400. HedgeCam moves the shutter for you when you tap a preset. In Yamera, set the shutter yourself to keep the brightness close: 1/15, 1/250, 1/1000.
- Zoom in on the darkest part of each picture. Pick the one you’d keep.
Then answer one question. Did the shutter speed I needed leave the picture too dark? If yes, you now know the next decision.
Reflection + CTA
Last week you picked the shutter. This week you pick what to pay for it. One more decision your phone was making for you, and it wasn’t asking.
Shoot in the lab this week and pick the one you’d keep.
Trust it. Trust yourself.
-TMac #shooton
