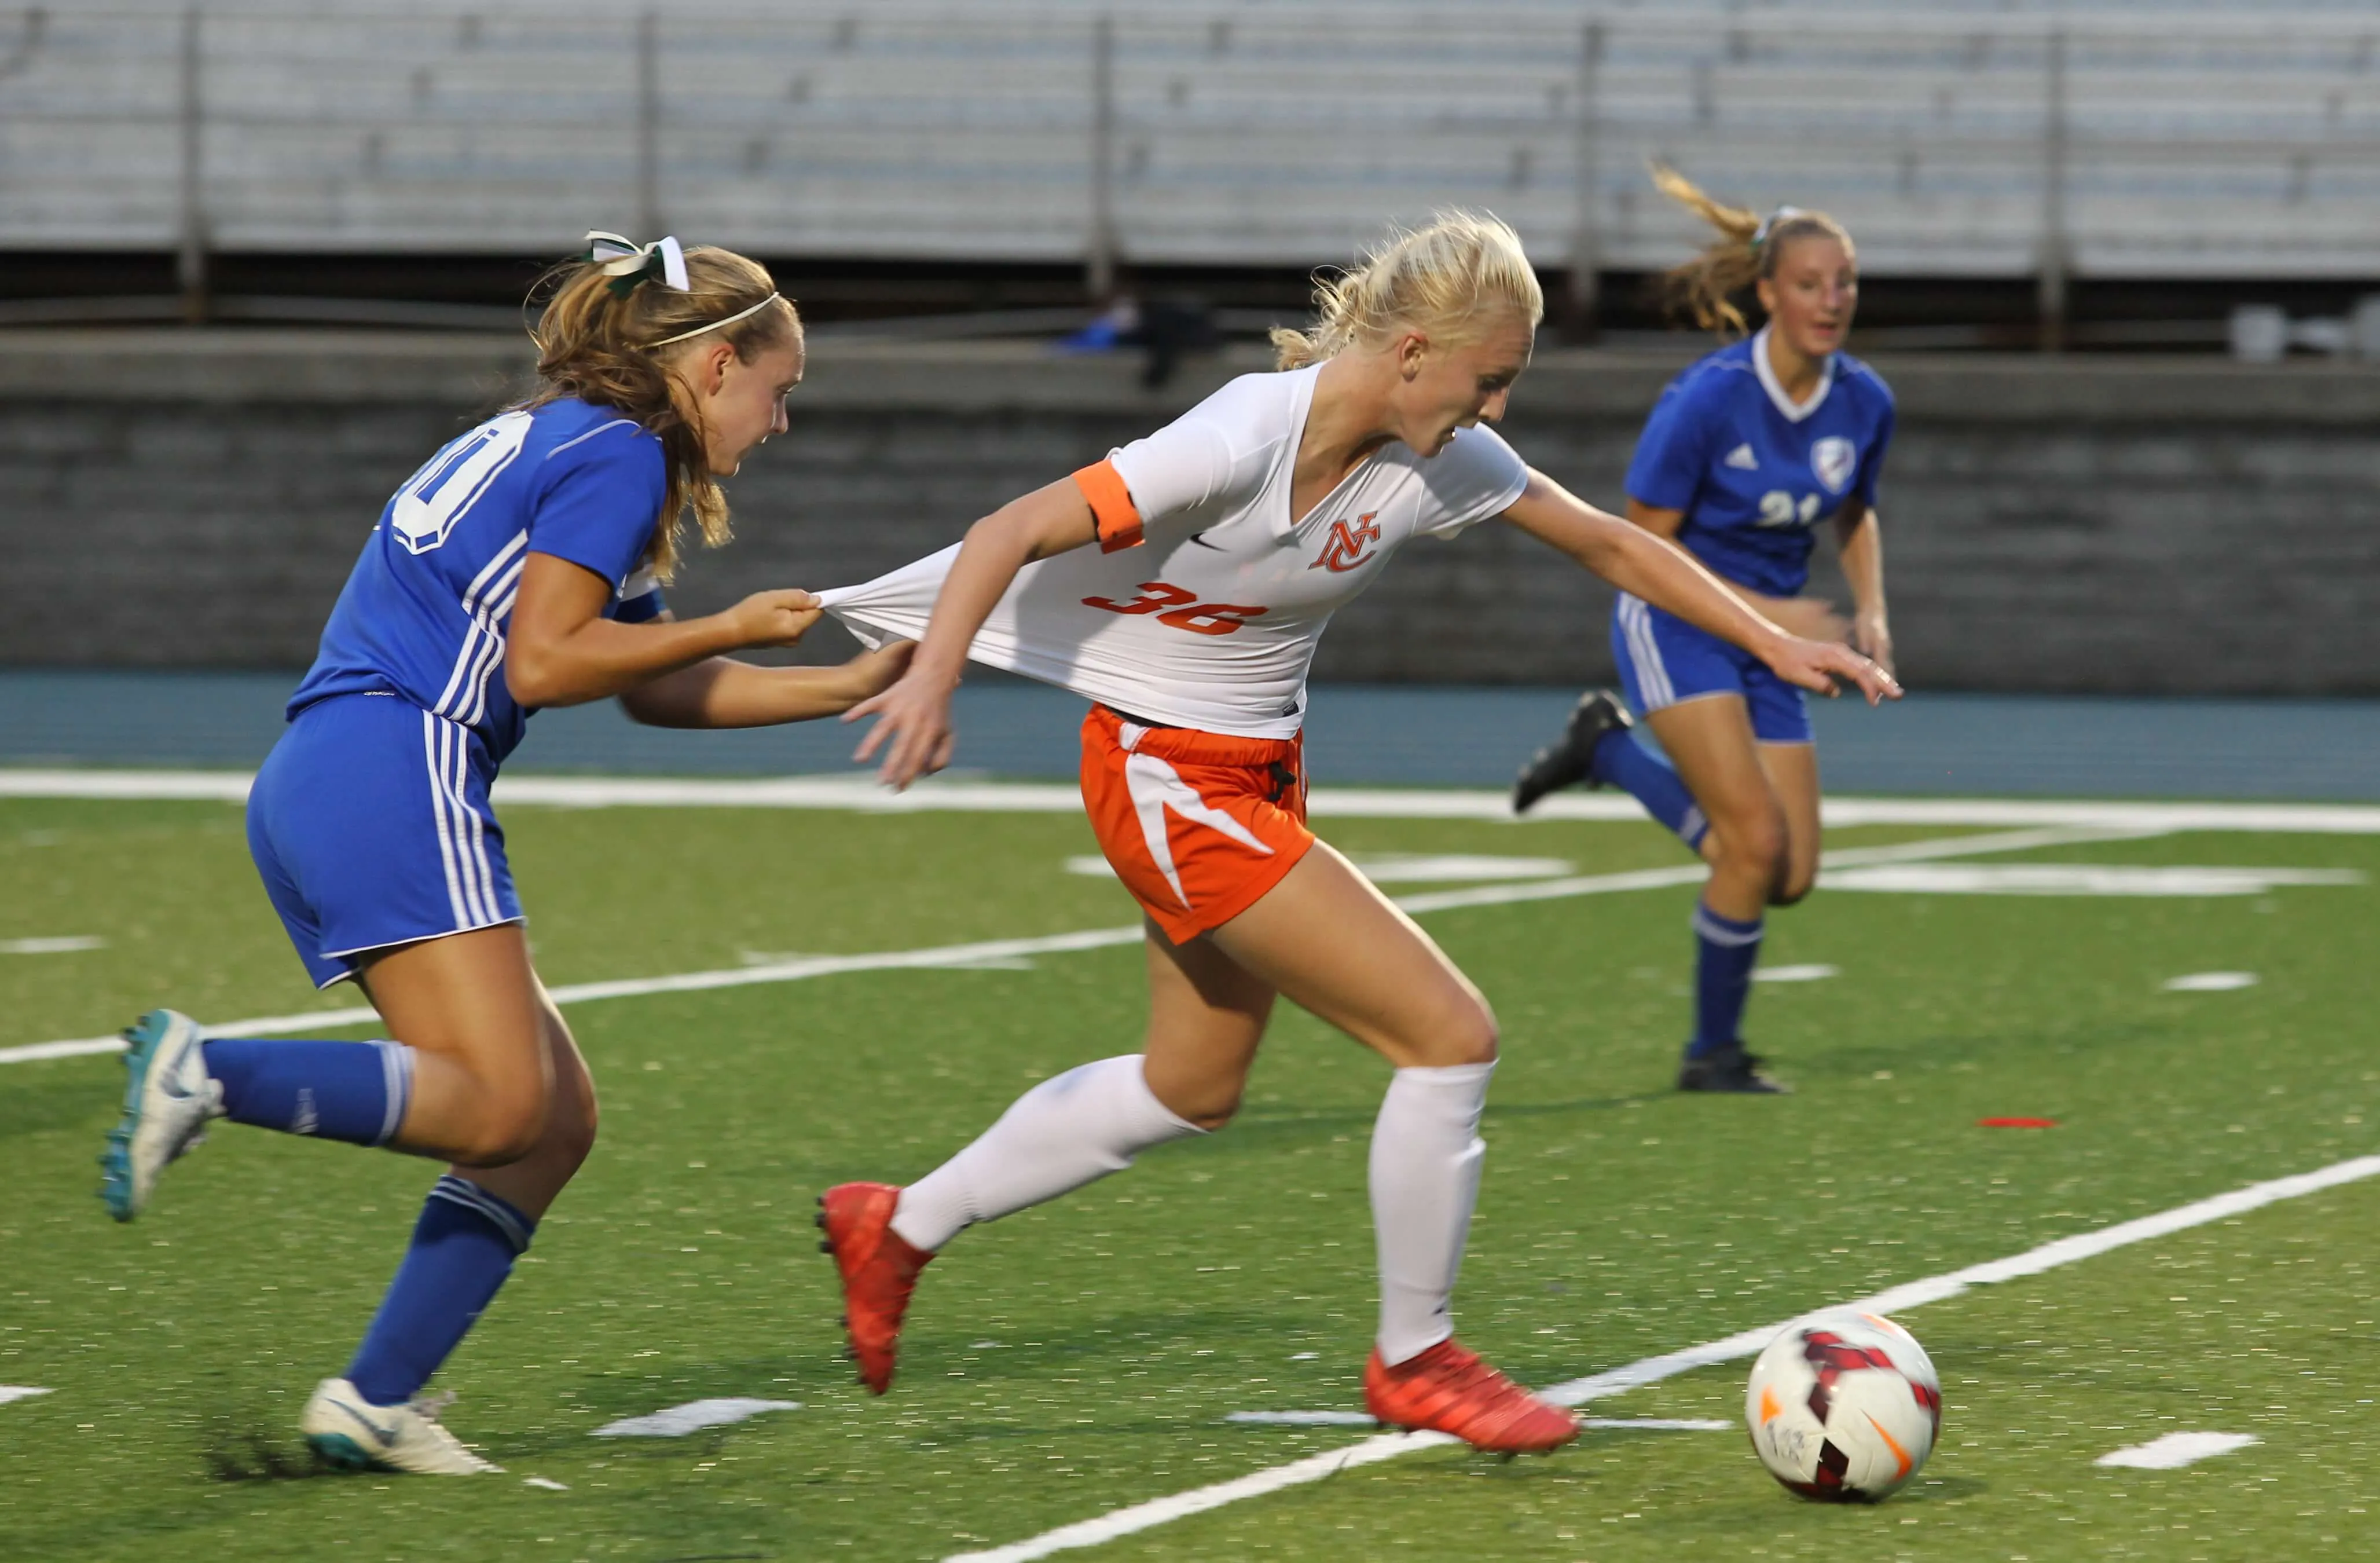
Blurry sports photos are one of the most common frustrations for beginner photographers, and almost every one of them blames the wrong thing. Bad autofocus. A cheap lens. A kid who moves too fast. The real cause is a single camera setting most beginners have never touched: shutter speed. Fix that one setting, and 80% of your blur disappears immediately.
LESSON PROLOGUE
Let’s be blunt: blurry sports photos aren’t a mystery. They’re a technique problem. Beginners blame the camera, the lens, the weather, or their kid “moving too fast.” But the real issue can be fixed with a simple settings change in manual mode.
Why Are My Photos Blurry? (It’s Not Focus.)
Teaching moment: Go back and look closely at the image at the top of this post. The blur is in the edges.
Most blurry sports photos aren’t caused by bad focus. They’re caused by motion blur. The subject moved faster than your shutter speed could freeze.
Beginners almost always blame the wrong thing first:
- Auto Focus.
- The lens.
- The camera body.
In reality, the blur is coming from the one setting they haven’t learned to control yet: shutter speed.
Foto Fact: Shutter speed is the slice of time your camera’s shutter opens and closes to freeze or smear motion. Shutter speed is measured by time; 1/125th of a second vs 1/2000th of a second. Today we fix it. One setting. One decision. One simple technique fix. Once you solve this, 80% of your blur disappears immediately.
Why This Happens
Shutter Speed Is Too Slow
Fast moving objects or subjects move faster than we expect. Our eyes adapt. Our cameras don’t.
When the shutter stays open too long, the camera records movement, not a frozen moment. The result usually isn’t dramatic blur, it’s a subtle softness along edges that quietly ruins the photo. Here’s the trap: Auto mode tries to help, but it doesn’t know what you’re shooting. It only sees light. So it guesses. And many times, it guesses wrong.
Here’s the technique reality for shooting action (always based on available light):
- 1/250 is too slow
- 1/500 is barely enough
- 1/800–1/1000 is your starting point
- 1/2000+ gives you insurance under great lighting conditions!
A slow shutter speed records too much time. A fast shutter speed freezes time cleanly. This isn’t a gear failure. It’s a technique choice.
A Photo Lab Rule: Change Your Shutter Speed
Motion blur beats bad focus every time.
Now go back and look at the image at the top of this post. With this in mind, notice where the blur actually appears — in the edges of the face and moving parts. It’s a nice action shot ruined by a slow shutter speed.
How to Fix Shutter Speed Using One Setting
Set a Baseline Shutter Speed
(On an iPhone, shutter speed can’t be changed natively and requires a third-party app, but the principle still applies. I will discuss this on phones in a future post.)
You don’t need to memorize your camera manual. You need to make one change.
Do this: Set your shutter speed to 1/800. Leave it there. Shoot.
That one decision solves most blur problems.
Then, Adjust for Conditions:
- Bright daylight → 1/1000–1/2000
- Overcast → 1/800–1/1000
- Indoor gyms → 1/400–1/800 (raise ISO confidently; don’t fear the grain)
Support the Shutter Speed
- Turn on continuous autofocus (AF-C / AI-Servo)
- Shoot in burst mode, not single shot.
Remember, these are technique decisions. Not magic. Not gear worship. As we like to say in the Photo Lab: “Raise your ISO. Live a little.”
That single change fixes most beginner blur problems. The faster the shutter speed the more “frozen” in time and sharper your image will look.
The Drills: Mastering Shutter Speed Indoors + Outdoors
If you want to own shutter speed, not just “sort of understand it,” run both drills:
- Outside → real-world motion
- Inside → controlled demonstration
Together, they lock technique into muscle memory.
Outside Drill — The 1/1000 Walk Test
Purpose: Train your camera to freeze real human movement.
Steps:
- Go outside in daylight between 8am–10am. (Framing should include a loose head-to-toe wide shot.)
- Set shutter speed to 1/1000. (Aperture set at f5.6. ISO 800 for this lab.)
- Have a lab partner walk across your frame left to right.
- Shoot a 3–5 frame burst. (If your frames are a bit dark, don’t change your shutter speed. Raise the ISO to 1000. Reshoot.)
- Zoom in onscreen and check edge sharpness.
- Repeat, this time with your partner jogging by. (Switch roles if you’re both photographers!)
What success looks like: A clean, frozen frame. No streaks. No softness. Edges sharp. Both moments frozen. If you can freeze a jogger, you can freeze almost any youth sport or activity moment.
Why this drill matters: Natural light gives you the room to raise your shutter speed, supported by raising ISO if needed, to learn how shutter speed and ISO interact.
Inside Drill — The Pinwheel Motion Test
Purpose: This is the same demo TMac used for years teaching beginners in the media lab. It works because you see the blur change as shutter speed changes.
Gear:
- A dollar-store pinwheel
- A fan
- Your camera (more with phones and shooting in manual with apps in a future post!)
- A table
Steps:
- Stand the pinwheel upright. (Tape the stem firmly to the edge of a table.)
- Spin it using the fan. Shoot the pinwheel blades. (Same aperture at f5.6, same ISO 800.)
- Start at 1/125 or 1/250. You’ll see obvious blur. (If your first frames are dark at 1/125 or 1/250, raise your ISO to 1250, or 2500.)
- Increase shutter speed step-by-step: 1/500 → 1/1000 → 1/2000
- Shoot a burst after each change. (Increase ISO as you go. Remember it’s a lab experiment.)
- Watch the blades go from streaky → crisp → frozen.
What success looks like: Blades frozen mid-spin, no smear, no ghosting.
Why this drill matters: Indoors you will need to raise ISO when you raise your shutter speed. That teaches the real tradeoff: freeze motion beats fear of noise. And because everything is controlled, you can finally understand how shutter speed is freezing, or not freezing, motion, and its relationship to ISO.
Lesson Learned — Common Mistakes to Avoid
If your sport or action photos are blurry, your camera doesn’t hate you, and please, don’t buy another lens! Check the shutter speed first. Control motion, and sharpness will follow.
Mistakes to avoid:
- Shooting a sport or activity at 1/250
- Using digital zoom (ever!)
- Staying in Auto and hoping for the best
- Reviewing photos instead of shooting
- Shooting from the stands
—TMac
Photographer | Teacher | Coach | Head Zoom Jockey, ZoomWithOurFeet
#Shooton
